The Dreaded Mixdown – EQ
Last week I got into some very basic principles of mixing. So basic they may have seemed obvious to some but I think it’s important to remind ourselves of how simple things need to be sometimes. That reminder has actually impacted my music making a bit lately (which is the whole idea!). I’ve been much more conscious of my instrument/sound selection, even seeing how far along I can get into a tune without reaching for the EQ or compressor. That said, EQs and compressors exist for a reason and there is no disputing their usefulness. So today let’s talk a little about EQ, a vital tool in the producer’s toolbox.
EQ Basics #1 – Roll off low frequencies
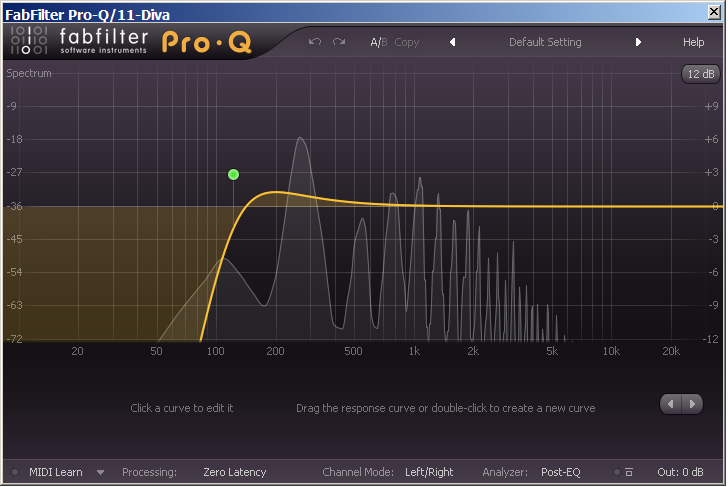
Roll off the low frequencies on each channel whenever possible. The low frequencies can quickly get out of control and clutter up your mix. Especially in electronic dance music where the low frequencies are so important to the focus of most songs. It’s amazing where low frequencies can pop up in your audio where they aren’t needed. Even in high frequency sounds like hi-hats, shakers, etc, it’s good to roll off, you never know what low freqs are lurking. The screenshot below is a melodic repeating lead I have in an upcoming tune. The lows aren’t needed for this musical idea to come across, so I’ve rolled off everything under about 150Hz. And it looks like I could have even gone higher. I like to use an EQ with a steep roll off curve for this process. I find a lot of EQs aren’t up to the task for this, like Ableton’s standard EQ8. So I’ve been using FabFilter’s Pro-Q for the job with it’s 48db curve option. I know the latest version of Ableton EQ8 is supposed to be 48db (The 4x setting) but it doesnt seem the same to me. Sometimes I’ll even use 2 EQ inserts to be sure. I like to apply this wherever possible, every little extra bit of of low end headroom counts.
EQ Basics #2 – Narrow cuts, Broad boosts
As a general rule of thumb, it’s best to cut frequencies with a narrow Q and boost frequencies broadly when applying EQ. Reason being, it tends to sound unnatural when doing the opposite. Go ahead, try it. Turn the Q way up and sweep through the frequencies. It sounds weird and perhaps even painful in spots. Now there may be some scenarios where you want an unnatural EQ sound for effect. If so, have at it, being creative is what’s it’s all about. But in the context of using EQ to dial-in and clean up existing sounds, narrow cuts and broad boosts are good practice.
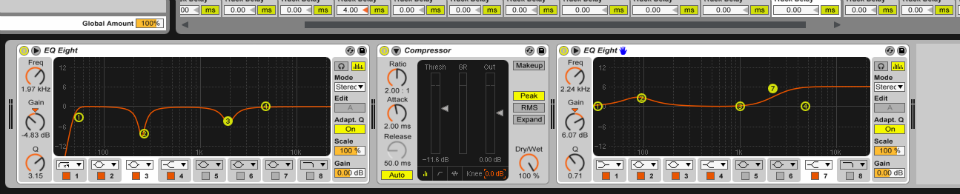
Also, as illustrated in the image below, I like to use 2 separate EQs when using a compressor in my chain. First EQ is for cuts, second for boosts. Reason for this being if I have any low level hiss or noise in the audio coming in, I want to try and get rid of it before it hits the compressor and gets made more noticeable in the mix. Especially critical when I have signal coming in from an external analog device that tends to pickup more noise.
EQ Basics #3 – Mid-Side
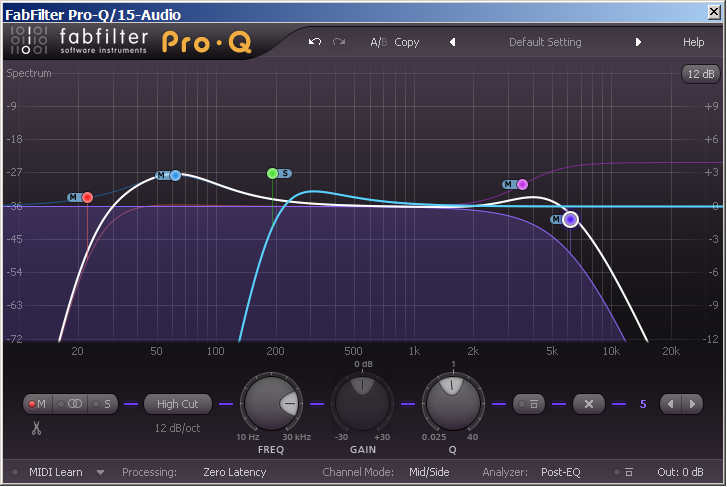
Is this “basic”? It might depend on who you talk to. I use it quite a bit so Im going with it here. EQs with Mid/Side functionality basically split the audio signal into, you guessed it, the middle part of the stereo spectrum and the side parts so you can EQ them separately. Obviously you need a stereo sound (opposed to mono) to begin with for it work. Since bass heavy sounds are mostly only useful in mono, I like to eliminate any low frequencies found in the sides of the stereo field on them. You can also apply it to the mastering chain. Generally speaking, the sub 200Hz frequencies are best in mono, thus dont need the side informaiton. Same with a kick drum or a low Tom. It’s also handy for unruly pads and hi-frequency percussion that you can use to widen the song up with but may be mucking up the low frequencies where your bass needs to shine.
EQ Basics #4 – Kick and Bass
It depends on the sounds or samples used but a couple of common frequencies I’ve found pretty important in the low end are 60Hz and 80Hz. Very often it’s beneficial to aim the EQ of your kick drum at the 60-65Hz mark. That’s where the ever important thump is for your dance floor kick. Every kick isn’t created equal of course but your typical 909 type kick usually likes a bump in this area. As for bass, the 80-90Hz is a spot to aim the EQ at for that powerful bass those big speaker stacks crave. Now there’s always going to be an overlap in low frequencies with the kick and bass so you kind of just have to do your best to carefully EQ around those sweet spots to get them humming as nicely as possible. There are some other tricks for squeezing the bass and kick together, like the ubiquitous side-chain compression, that I can talk about next time.
Let me close by saying, ALWAYS USE YOUR EARS. There’s no one-trick-fits-all that anyone can tell you. Don’t just make EQ cuts and boosts and slap compressors everywhere just because some dude on the internet said you should do so on specific kinds of sounds. You should have an idea of what you want out of a specific sound and how you want it portrayed in the mix. Then use your tools to get you there if the sound isn’t there already. Again, ideally try to start off with quality sounds that need minimal processing, the simpler the better.